The pane on the right of the main window is a read-only view of the selected publication — its preview, citation, fields, notes, and attachments — so you can browse without any risk of changing something by accident. Editing happens in a separate window. Click ✎ Edit… at the top of the view pane, double-click a row in the table, press Enter with the publications table focused, or choose Publication → Edit Publication… (⌘E / Ctrl+E) to open the editor window for that entry. (This mirrors BibDesk's separate editor windows.)
The editor window is the full-featured editor: everything about an entry can be changed there — its individual fields, its cite key, its BibTeX type, the files attached to it, and the free-form notes that travel with it. You can open several editor windows at once (one per entry; asking for one that is already open just brings it to the front). Changes you make there update the main window live, and are saved with the rest of the library by File → Save (⌘S / Ctrl+S), which works from the editor window too. The sections below describe the fields, cite key, type, notes, and attachments as they appear in that editor window.
This chapter explains the editing model in depth. It is worth understanding two ideas up front, because they govern almost everything else:
- You edit the raw BibTeX, not the pretty display. The table and the preview card show a cleaned-up, de-TeXified rendering of each value. The editor, by contrast, lets you change the actual text that will be written to the file. This distinction matters the moment you want braces, macros, or TeX accents — see The raw-value model.
- Editing is explicit-save by default. Your changes live in memory and are not written to disk until you save (⌘S / Ctrl+S); there is no autosave unless you turn one on. Everything is undoable in the meantime — see Undo and redo — and the model is explained in detail under The dirty/save model.
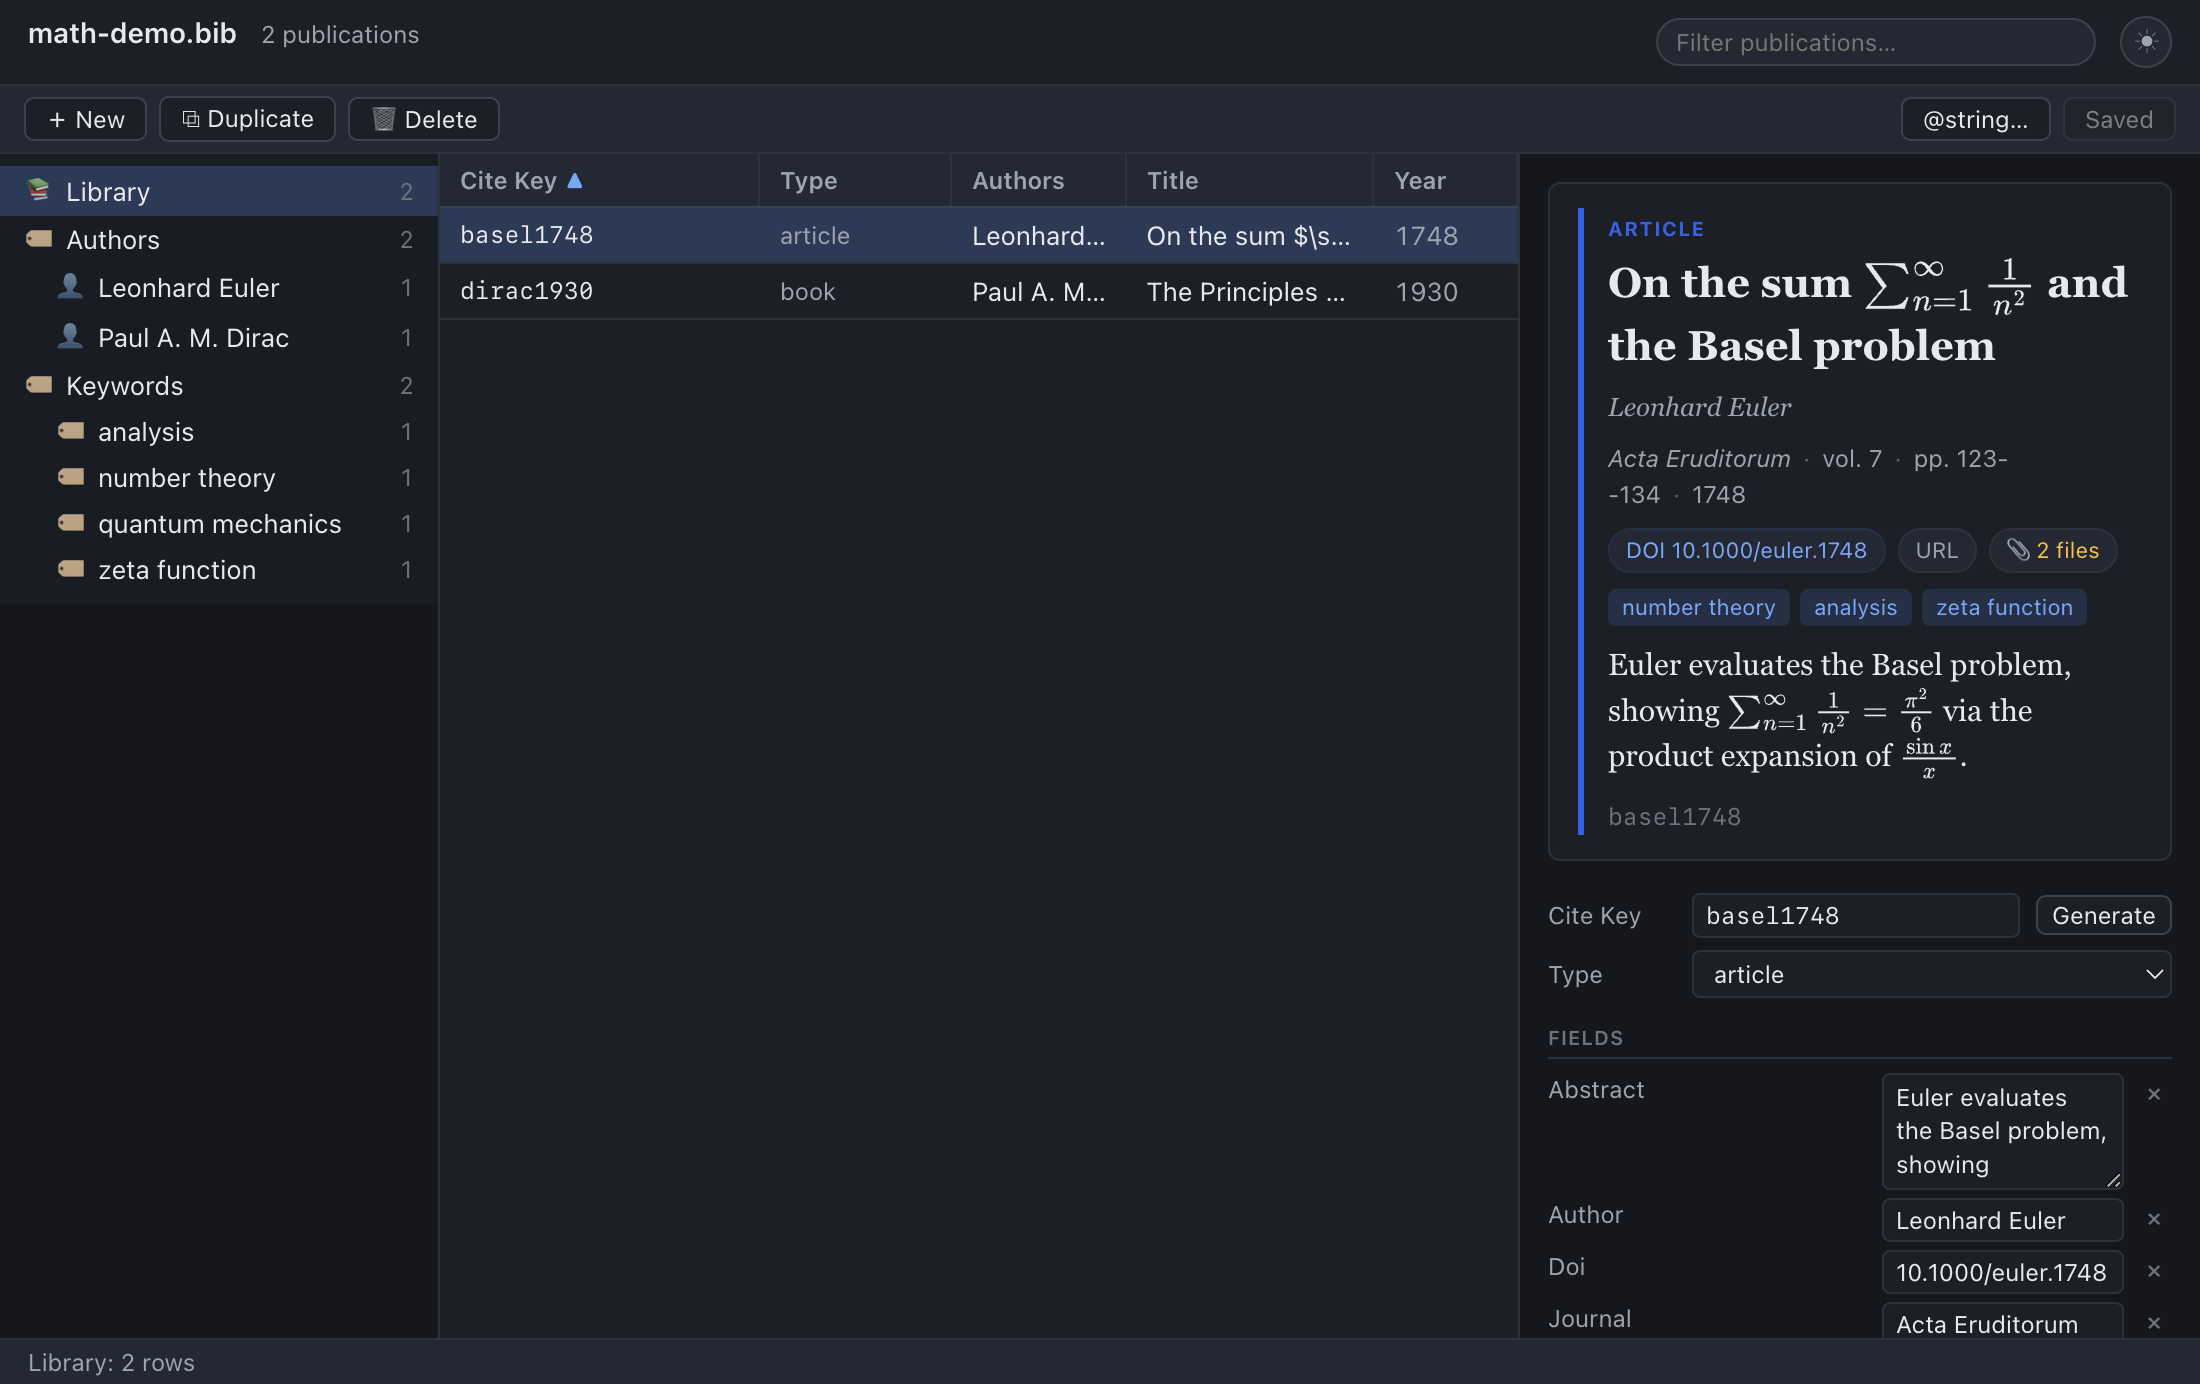
Note: The view pane only shows an entry once a publication is selected. If you see "Select a publication to see its details," click any row in the publications table first. See Browsing & Searching.
Anatomy of the editor window#
The editor window is laid out as two columns: the read-only preview on the left, the editable form on the right.
| Column | Section | What it is | Covered in |
|---|---|---|---|
| Left | Journal cover | The journal's cover thumbnail, or a generated stand-in. | Attachments |
| Left | Preview card | A typographic rendering of the entry (title, authors, venue, chips, tags, abstract). Read-only. | Preview & Citations |
| Left | Citation | A formatted citation in your chosen CSL style. Read-only. | Preview & Citations |
| Right | Identity | The cite key (with Generate) and the entry Type. | Cite key and type below |
| Right | Fields | Every editable field, plus a row for adding new ones. | Editing fields below |
| Right | Annotation | The entry's Markdown notes (the Annote field), with an Edit button. |
Notes & Abstracts |
| Right | Attachments | Files and links attached to the entry. | Attachments |
The preview and citation always reflect your latest edits: each time you commit a change, they re-render, so you can watch the formatted output update as you type.
Why the split layout#
The preview re-renders on every committed change, and it changes height as it does — a title that wraps onto a second line and back, an abstract that grows. When the preview sat directly above the fields, that movement shoved the very field you were typing in up and down under the cursor. Putting the preview in its own column fixes the top edge of the form, so the field you are editing never moves. The preview grows downward inside its own column, where it disturbs nothing.
Each column scrolls independently, so scrolling a long field list does not drag the preview along with it.
The editor window opens at 880 × 720. If you drag it narrower than about 560px the layout folds back to a single stacked column (preview above fields) and the window scrolls as one — two side-by-side scrolling boxes are unusable at that width.
Note: The split is specific to the standalone editor window. The main window's read-only view pane is a narrow side panel where two columns would not fit, so it keeps the stacked layout.
Editing fields#
The Fields section lists every field stored on the selected entry, in the order BibDesk keeps them. A handful of fields are deliberately not shown in this list because they have dedicated homes elsewhere in the window:
Annote(and its compressed twinBdsk-Annotation) — shown and edited in the Annotation section instead (see Notes & Abstracts).Bdsk-File-N— the managed attachment blobs, shown in the Attachments section instead (see Attachments).Bdsk-Color— the colour label, set from the row's right-click menu or Publication → Color Label rather than typed as raw text.
The abstract is a special case: it may be stored plain, escaped, or compressed in
Bdsk-Abstract, and you always get exactly one decoded, editable Abstract
row whichever storage is in use — never the raw compressed blob.
Everything else — Author, Title, Journal, Year, Crossref, custom
fields you invent, and so on — appears as an editable row.
Fields the entry type expects#
Below the stored fields, the editor also offers the required and optional fields for the entry's type that this entry does not have yet, as empty rows. They are prompts, not data: nothing is stored until you type a value into one and commit it, and an empty one is simply ignored. Required fields carry the req marker; neither kind has a − button, because there is nothing yet to remove. Change the Type and the offered set changes with it.
How to edit a value#
- Click a field's value box to begin editing.
- Type your change.
- Commit it:
- For an ordinary single-line field, press Enter (or click away / Tab out of the box).
- For a long field (see below), click away to commit. Pressing Enter inside a multi-line box inserts a newline rather than committing.
A change is only sent to the document when the committed value actually differs from what was there before. Re-committing an unchanged value is a no-op and will not mark the library dirty.
Tip: "Commit" simply means "leave the box." If your edit seems not to have taken effect, you most likely changed the text but never pressed Enter or clicked elsewhere. See Troubleshooting.
Single-line versus long (textarea) fields#
The editor automatically chooses the right kind of input for each field:
Single-line input — used for short values. Commits on Enter or on blur (clicking away).
Multi-line textarea — used when a value is long or free-form. A field opens as a textarea when either:
- its name is
Abstract(case-insensitive), or - its current raw value is longer than 60 characters.
A textarea commits only on blur — click outside it (or Tab away) to save. Enter adds a line break.
- its name is
This 60-character rule is applied to the raw value, so a field with a long macro expression or a value full of braces may open as a textarea even if its displayed form looks short.
Note: The Abstract field is rendered as Markdown in the preview card.
You still edit it as plain text here; see
Notes & Abstracts for the Markdown conventions.
Special-purpose field editors#
A few fields are recognised by name and edited with a purpose-built control rather than a text box:
Readis a boolean field, so it shows a checkbox. A stored value of1,yes,true, oroncounts as "read"; anything else (or no field) is unread. Ticking the box storesYes; unticking it removes the field altogether (an empty value is never stored — see Removing a field).Ratingis a rating field: a row of five stars. Click a star to set the rating, click the current rating again to clear it.Keywordsgives a chip editor for its comma-separated tokens (see Notes & Abstracts and Browsing & Searching).- Three-state fields get a small — / No / Yes dropdown. No field is three-state out of the box; the category exists for you to fill in.
These editors also appear when you create the field from the + add-field row:
the blank row starts as a text box, but the moment you name it Read it switches
to a checkbox (just as naming it Keywords gives the chip editor).
Note: Which field names count as boolean, rating, three-state (and person, URL, local-file, citation) is configurable in Preferences → Fields → Field types. Rename or extend those lists and the editors follow.
Field-value autocomplete#
Autocomplete is offered only for shared-vocabulary fields — the fields whose
values you tend to reuse verbatim across entries, such as Journal, Publisher,
Series, Editor, Author, Institution, Year, and Volume. When you click
into one of these single-line fields, the editor offers an autocomplete list of
values already used in that same field elsewhere in your library. As you type,
the list narrows to matching suggestions; pick one to fill the box. This makes
consistent data entry effortless — the same journal name, publisher, editor, or
series spelled the same way every time.
- The suggestions are drawn from the distinct existing values of that field across every entry, deduplicated case-insensitively and sorted. They are gathered the first time you focus the box. So the more consistently you have filled a field in the past, the more useful its completions are.
- For list-valued citation fields (
Cites,Cited-By) the suggestions are the individual tokens, split on commas and semicolons, rather than whole comma-joined strings — so you complete one entry at a time. - Fields whose values are unique to each entry or are free-form prose —
Title,Subtitle,DOI,URL,Eprint,Pages,Note,Annote,Abstract,ISBN,Date-Added,Date-Modified— do not offer completions, because there is rarely a useful "existing value" to reuse for them. Keywordshas no completion list. It is a chip editor, not a text box, so there is nowhere to hang one; build a controlled vocabulary from the Keyword categories in the sidebar instead.
Tip: Autocomplete is the easiest way to keep a journal, publisher or series name spelled one way throughout. Pick the existing value from the list rather than retyping it, and the dynamic sidebar categories built from those fields stay clean instead of fragmenting into near-duplicates.
The raw-value model: what you are really editing#
This is the single most important thing to understand about the field editor.
The publications table and the preview card show each value after a display transform: BibTeX protective/grouping braces are stripped and TeX escapes are converted to Unicode. So a title stored as
title = {The {C}alabi-{Y}au Manifold}is shown as "The Calabi-Yau Manifold." The field editor, however, gives you
the raw BibTeX text — The {C}alabi-{Y}au Manifold, braces and all — because
that is what will be written back to your .bib file.
The consequences are worth spelling out:
- To protect capitalization (so BibTeX/LaTeX does not lowercase a word in a
title), brace it yourself: type
{DNA} sequencing, notDNA sequencing. - To enter accents or special characters, you may type either the Unicode
character directly (
Erdős) or the TeX form (Erd\H{o}s). Both round-trip; type whichever you prefer to see in the file. - To use a macro (an
@stringabbreviation), type the macro name. Note the current field editor stores values as literal strings: if you typejan # { 2024}it is saved verbatim as that literal text rather than parsed into a concatenation. Defining and managing the macros themselves is done in the@stringmacro editor; macro-aware concatenation in the field editor is a planned future refinement. - URL, DOI, and file fields are shown raw and un-transformed, because de-TeXifying a URL could corrupt it. What you type is exactly what is stored.
Warning: Because you are editing raw BibTeX, a stray unbalanced brace
({ with no matching }) will be written to the file as-is. Keep your braces
balanced.
Adding a field#
Below the Fields list is a small green + button (a circle). To add a field the entry does not yet have:
- Click the green +. A blank field-editor row appears (with the cursor in the name box). Click + again for more rows.
- Type the field name in the left box — for example,
Publisher. (Field names are case-insensitive and are normalized to lower-case on save.) - Type the value in the right box.
- Press Enter to add the field. To discard the row without adding it, click its red − button (or press Escape).
The new field is added immediately and appears as a normal editable row. An empty field name is ignored. If you add a field whose name already exists on the entry, its value is replaced.
Moving focus out of the row entirely — clicking elsewhere, tabbing out of it, or closing the editor window — also adds the field, so a name and value you typed but never confirmed with Enter are not silently lost. Moving between the row's own boxes does not commit anything. The − button and Escape are the only ways to throw the row away.
Tip: You can add any field name you like, including non-standard ones.
Standard BibTeX fields for the entry's type are simply the ones BibDesk
expects; the editor does not stop you from inventing your own (e.g.
Keywords, Rating, or a project-specific tag field).
Removing a field#
There are two equivalent ways to remove a field:
- Click the red − button (a circle) at the right end of the field's row.
- Clear the field's value entirely (delete all its text) and commit the empty value.
Both delete the field outright from the entry — an empty value is not stored
as field = {}; it is removed. This is intentional and matches BibTeX
conventions, but it can surprise you: see Troubleshooting if
a field "disappears."
Required fields can't be deleted. Fields that are required for the entry's BibTeX type (for example
author,title,journal, andyearon an@article) show a small req marker instead of a − button, so you can't accidentally remove them. Change the entry's Type and the set of required fields changes with it. (Clearing a required field's value still removes it — the marker only hides the button.)
Note: Inherited (crossref) fields have no − button, because they are not stored on this entry in the first place — see Crossref inheritance.
Inherited (crossref) fields#
If the entry borrows fields from a parent via the Crossref field, those
inherited fields appear in the list muted, each marked with an
(inherited) badge, and without a − button. They are shown for
context — so you can see the entry's full effective field set — but they are not
physically stored on this entry.
Editing an inherited value does not change the parent. Instead it creates a local override: committing a new value writes that one field onto the child entry, where it then appears as a normal (non-inherited) field and shadows the parent's value. The rest of the inheritance is unaffected. This is covered fully under Crossref inheritance.
Cite key and type#
The Identity block at the top of the form column holds the two pieces of metadata that are not ordinary fields: the cite key and the entry type.
Cite key#
The Cite Key is the unique label you use to refer to the entry from LaTeX
(\cite{einstein1905}) and from notes ([[einstein1905]]).
- To edit it manually, click the box, type a new key, and press Enter (or click away). An empty cite key is rejected — the change is ignored and the previous key is kept.
- To generate one automatically, click Generate, or choose Publication → Generate Cite Key (⌘K / Ctrl+K).
Characters BibTeX cannot hold in a key — a space, and ' " @ , \ # { } ~ % ( ) =
— are filtered out as you type, so they never reach the box. A warning
triangle appears beside the box when the key is empty, when another entry
already uses this cite key, or when it contains characters TeX finds fragile
(&, $, ^). The triangle is advice, not a veto: a duplicate or fragile key
you type deliberately is still committed.
How Generate works#
Generation derives a cite key from the entry's own fields using a configurable
cite-key format. The factory default is %p[/][/etal1]2:%Y%u0, which reads:
| Piece | Specifier | Meaning |
|---|---|---|
| Up to two surnames | %p…2 |
The surnames of the entry's people — Author, or Editor when there is no author (an edited book keys off its editor rather than producing an author-less key) |
| Name separator | [/] |
Joins two surnames with / |
| "and others" marker | [/etal1] |
Once there are more than the two requested names, show only the first and append /etal |
| Literal colon | : |
A literal : separator |
| Year | %Y |
The 4-digit year |
| Uniquifier | %u0 |
A disambiguating letter (a, b, …) appended only on a clash |
So the default gives Smith:2020 for one author, Smith/Doe:2020 for two, and
Smith/etal:2020 for three or more — with Smith:2020a, Smith:2020b … if that
key is already taken by another entry. The entry's own current key never
counts as a collision, so regenerating a key for an entry that already owns
Smith:2020 simply returns Smith:2020 again.
You can change the format in Preferences → Cite keys → Format. The same
mini-language drives the AutoFile
file-name format; common specifiers include %a/%A (authors, surnames or
initials), %p/%P (the same, falling back to editors), %t/%T (title
characters / title words), %Y/%y (4- or 2-digit year), %f{Field} (any
field), and %u/%U/%n (a lowercase-letter / uppercase-letter / digit
uniquifier). A digit after the uniquifier says how many characters to append:
%u0 appends one only on a clash, %u2 always appends two.
Note: Generation reads whatever the entry currently holds — with the
default format, its Author (or Editor) and Year. If those fields are
empty, the generated key will be sparse (just the parts it can fill). Fill them
in first, then click Generate, for a meaningful key.
Generating keys for several entries at once#
Generate Cite Key acts on the whole selection. Select one entry and it
regenerates that key; select many (Shift-click a range, ⌘-click to add, or
Select All) and Publication → Generate Cite Key (⌘K) regenerates
all of them in a single undo step. Keys stay unique across the batch — if
two selected entries would derive the same base key, they're disambiguated
against each other (and the rest of the library) — and any Crossref references
to a renamed entry are updated so they don't dangle.
Uniqueness#
Cite-key comparison throughout the app is case-insensitive (matching
BibDesk's itemForCiteKey:): Smith2020 and smith2020 are treated as the same
key. When the app must invent a key on its own — for a new or duplicated entry —
it appends -1, -2, … to the base until the result is unique. Manual edits are
not forcibly de-duplicated; if you deliberately type a key that collides, the app
keeps what you typed (BibTeX itself, and a crossref lookup, will then resolve to
the first matching entry).
Type#
The Type dropdown sets the entry's BibTeX type. The picker offers every type BibDesk knows about:
article, book, booklet, commented, conference, glossdef, inbook,
incollection, inproceedings, jurthesis, manual, mastersthesis, misc,
periodical, phdthesis, proceedings, techreport, unpublished, url,
electronic, webpage
— plus any custom entry types you have defined in Preferences → Fields → Entry types.
Changing the type takes effect immediately. If the entry's existing type is one not in that list (for example, an exotic type from a hand-edited file), it is added to the top of the dropdown so it is not lost.
What "type" means: the type tells BibTeX, BibDesk, and citation styles how to interpret the entry — which fields are expected, how it should be formatted in a bibliography, and which CSL category it maps to (e.g.
article→ journal article,inproceedings→ conference paper). Changing the type does not add or remove any of your stored fields; it only relabels the entry. If you switch anarticleto abook, yourJournalfield is still there — it is just no longer the field that type cares about.
Entry lifecycle: New, Duplicate, Delete#
The toolbar above the three panes operates at the library level. The relevant buttons — each also available from the Publication menu, several with a keyboard shortcut — are:
| Button | Menu / shortcut | Action | Needs a selection? |
|---|---|---|---|
| + New | Publication → New Publication (⌘N / Ctrl+N) | Create a fresh, empty entry, select it, and open its editor window. | No |
| ⧉ Duplicate | Publication → Duplicate (⇧⌘D / Shift+Ctrl+D) | Copy the selected entry under a new cite key. | Yes |
| 🗑 Delete | Publication → Delete Publication, the Delete / Backspace key, or right-click → Delete | Remove the selected entry (or entries). | Yes |
The Publication menu also holds New Publication with Crossref, New Publications from Clipboard (⌥⌘L — see Importing & Exporting), Generate Cite Key (⌘K), Select Crossref Parent, Color Label ▸, Find Duplicates… (see Browsing & Searching), Add File Attachment…, AutoFile Linked Files, Consolidate Linked Files…, Find Broken Links…, Find Open-Access PDFs… and OCR Scanned PDFs… (see Attachments), and Macros (@string)… (the same macro editor as the @string… toolbar button).
Duplicate and Delete are disabled (greyed out) when no entry is selected.
+ New#
Creates a brand-new entry with no fields, of the type set in Preferences →
Fields → New entries → Default type (factory default article). Its cite key is
auto-assigned a unique placeholder (based on untitled, suffixed -1, -2, …
if untitled is taken). The new entry becomes the selection and its editor
window opens straight away, so you can start filling it in without hunting for
the row — a new entry sorts in wherever its placeholder cite key falls, which is
often out of view. Change its type from the Type dropdown if the default is
not what you want.
⧉ Duplicate#
Makes a copy of the currently selected entry. What is copied:
- The entry type.
- Every field, copied as its raw value — including attachment blobs
(
Bdsk-File-N), notes (Annote), and theCrossreflink.
What changes:
- The cite key. The copy gets a unique key based on the original plus
-copy(e.g.smith2020-copy, thensmith2020-copy-1, … if needed).
The duplicate is selected after creation. Duplicating is the quickest way to enter a run of similar entries (several papers from the same journal and year, several chapters of one book): duplicate, then change only the fields that differ.
🗑 Delete#
Removes the selected entry (or entries) from the library. You can delete in several equivalent ways:
- The toolbar 🗑 Delete button — this removes the focused row only, even if several are selected.
- Publication → Delete Publication, or the Delete / Backspace key with the publications table focused — both remove the whole selection (one row or many).
- A right-click on a row and Delete entry / Delete N entries from the context menu.
Note: When several rows are selected, deleting them is a single undo step — one Edit → Undo (⌘Z / Ctrl+Z) restores the whole batch. The multi-select view itself has no delete button; use the key or the context menu.
Tip: A deletion is undoable, and is in any case only in memory until you
Save: if you have not yet saved, File → Revert to Saved reloads the last
saved version. Once you save, the deletion is written to the file (though the
previous version survives in the .bib.bak backup — see
The dirty/save model).
To set a field or add/remove a keyword across many entries at once, use the floating batch-edit bar that appears near the bottom of the window when several rows are selected: a Field + value pair with a Set button, and a Keyword box with + Keyword / − Keyword buttons. See Configurable Panels → Batch tools. Colour labels are not in that bar — set them from the row's right-click menu or Publication → Color Label ▸, which also act on the whole selection.
Crossref inheritance#
BibTeX's Crossref mechanism lets one entry — the child — borrow fields from
another — the parent. It is the standard way to avoid repeating shared
bibliographic data: several chapters that all belong to one edited book can point
at a single @book (or @proceedings) entry for the shared publisher, year,
editor, and book title.
Setting up a crossref#
- Select the child entry.
- Add (or edit) a field named
Crossref. - Set its value to the cite key of the parent entry.
The moment you do this, the fields the child does not define itself, but which the parent supplies, appear in the child's Fields list, each marked (inherited). The parent need not appear before the child in the file; the link is resolved live by cite key (case-insensitively).
A worked example#
Consider an edited proceedings volume and one paper within it:
@proceedings{popl2024,
  title     = {Proceedings of the 51st ACM Symposium on Principles of Programming Languages},
  booktitle = {POPL 2024},
  editor    = {Jane Q. Public},
  publisher = {ACM},
  address   = {New York, NY},
  year      = {2024}
}

@inproceedings{ng2024types,
  author   = {Alice Ng},
  title    = {A Calculus of Effect Handlers},
  crossref = {popl2024},
  pages    = {101--128}
}
When you select ng2024types, its Fields list shows its own author,
title, crossref, and pages as normal rows, and additionally shows
publisher, address, editor, and year as muted (inherited) rows
borrowed from popl2024. The child did not have to restate any of them.
Note: BibDesk's booktitle workaround. For the four entry types
inbook,incollection,inproceedingsandconference, the app copies the entry's ownTitleinto its ownBooktitlewheneverBooktitleis empty — exactly as macOS BibDesk does. Song2024typesabove picks up a localbooktitleof "A Calculus of Effect Handlers" the moment it is loaded, and that is a real stored field, not an inherited one. If you want the venue there instead, setBooktitleon the child yourself — an existingBooktitleis never overwritten, so whatever you type wins from then on.
Overriding an inherited field#
To override one inherited value just for this child — say this one paper used a different page range convention, or you want a corrected year — click the muted inherited row and edit it as usual. Committing the change writes that field onto the child. It then becomes a normal, non-inherited row (gaining a − button), and it shadows the parent's value for this entry only. The parent and all its other children are untouched.
To go back to inheriting, remove your local override (the − button or by clearing it); the parent's value reappears as inherited.
Chain and collision rules#
- Resolution is by cite key, case-insensitively. If two entries happen to share a cite key, the first one in the file is used as the parent (matching BibDesk's behavior).
- Inheritance is exactly one level deep. A child reads its parent's own
fields; it does not follow a chain on to the parent's parent. BibTeX itself
only supports single-level crossrefs, so this matches what your
.bibwill do. A self-referential or circularCrossreftherefore cannot loop — but it also will not give you anything. - Nothing stops you typing an invalid
Crossref. The editor does not refuse a key that points at an entry which itself has aCrossref, or at the entry itself; you simply get no inherited fields. - A child always wins over its parent for any field the child defines locally; inheritance only fills in fields the child is missing.
- Citation fields (
Cites,Cited-By) are never inherited.
@string macros#
@string macros are reusable abbreviations stored at the top of your library.
The classic use is journal names: define prl once as the full
"Physical Review Letters," then reference prl from every entry in that journal.
A macro is defined once and expanded everywhere it is used, so correcting a
journal's name in one place fixes it throughout.
Open the macro editor with the @string… button in the toolbar.
Using the macro editor#
The editor is a modal listing each macro as a name and an editable value:
- Add a macro by typing a name and value in the bottom row and clicking the + button (or pressing Enter in the value box). An empty name is ignored.
- Edit a macro's value by clicking its value box, changing the text, and clicking away (it commits on blur). The name is fixed once created.
- Remove a macro with the × button beside it.
- Re-add to rename: to rename a macro, add a new one with the desired name and remove the old one (then update any entries that referenced the old name).
Close the editor with the × in its header, or by clicking the dimmed backdrop outside the dialog. Macro changes mark the library dirty just like field edits and are written on the next Save.
An example#
Define a macro in the editor:
| Name | Value |
|---|---|
prl |
Physical Review Letters |
Then, in an entry's Journal field, you would reference it. On save, the macro
is written into your file's preamble as:
@string{prl = {Physical Review Letters}}Note on dependency ordering: Macros may reference other macros, and the app serializes them in dependency order — a macro is always written after the macros it depends on — so the resulting
.bibis valid for BibTeX regardless of the order in which you defined them. You do not need to define them in any particular sequence.
Tip: As noted under The raw-value model,
the field editor currently stores field values as literal text and does not
itself parse name # {literal} concatenations. Manage the abbreviations
themselves here in the macro editor.
Find & Replace#
To make the same change across many entries — fix a misspelled journal name, normalise a publisher, swap one keyword for another, or clean up a recurring typo — use Edit → Find & Replace… (⌥⌘F / Alt+Ctrl+F). It searches and replaces inside field values, across many entries at once, with a preview so you can check before committing.
The Find & Replace window#
The window has these controls:
- Field — a dropdown that scopes the search to a single field, or to All
fields. The list offers the common bibliographic fields:
Title,Author,Editor,Journal,Booktitle,Year,Publisher,Keywords,Abstract,Note,Annote,Doi, andUrl. Choose All fields to search every field on each entry. (Managed attachment blobs —Bdsk-File-N— are always skipped, so a replacement can never corrupt an attachment.) - Find — the text (or pattern) to look for. Press Enter here to run a preview.
- Replace — the text to substitute in.
- Regular expression — when ticked, the Find text is treated as a regular
expression and Replace may use capture-group references like
$1. When unticked, both are plain literal text. - Case sensitive — when ticked, matching respects letter case; otherwise it is case-insensitive.
- Find and Replace All buttons (see below).
If a group is selected in the sidebar, the window title notes it (e.g. "Find & Replace — in My Smart Group"), because the operation is scoped to the members of the currently selected group. With the 📚 Library group selected, that means the whole library.
The live-search box narrows the scope further: with a filter typed in the search box, Find & Replace acts only on the rows you can actually see, and the window title says so — "(search filter active — 12 shown)". Clear the search box first if you meant to change the whole group.
Preview, then Replace All#
Find & Replace is deliberately two-step so you never replace blind:
- Preview with the Find button (or press Enter in the Find box). Nothing is changed. The window reports how many occurrences were found and in how many fields — "N occurrence(s) in M field(s)." — and lists the matches: each row shows the entry's cite key, the field, and the value before → after the replacement, so you can confirm the change is what you intended. (The list shows up to 40 matches, with a "… and N more" line beyond that.)
- Apply with Replace All. This performs every replacement, marks the library unsaved, and reports "Replaced N occurrence(s) in M field(s)." The change is in memory, like any edit — write it to disk with Save.
If you typed an invalid regular expression, the window shows "Invalid pattern: …" and changes nothing, so a bad pattern is safe.
Warning: Replace All changes every match in scope in one go. Always run
the Find preview first and read the before/after list. Because the change is
only in memory until you Save, you can still back out a regrettable
Replace All by reverting (File → Revert to Saved) before saving — but once
saved, only the .bib.bak backup holds the previous version.
Copying entries, cite keys, and citations#
Several Edit-menu commands put information about the selected entry on the clipboard, and you can also drag a row out of the table. These are the bridge between your library and a document you are writing.
| Command | Shortcut | What it copies | Scope |
|---|---|---|---|
| Copy Cite Key | ⌥⌘K / Alt+Ctrl+K | The bare cite key, e.g. einstein1905. |
Focused row |
Copy \cite{…} |
⌥⌘C / Alt+Ctrl+C | A LaTeX citation command for the entry, e.g. \cite{einstein1905}. |
Focused row |
| Copy Citation | (no shortcut) | The entry's formatted citation (in your chosen CSL style) as plain text — ready to paste into an email or reading list. | Focused row |
| Copy Citation as RTF | ⌥⌘R / Alt+Ctrl+R | The same formatted citation as rich text, so its italics survive the paste into a word processor (plain text is put on the clipboard too, for apps that want it). | Focused row |
| Copy as BibTeX | ⌥⌘B / Alt+Ctrl+B | The entry's complete BibTeX source. | Focused row |
| Copy As ▸ RIS | (no shortcut) | The entries as RIS. | Whole selection |
| Copy As ▸ Minimal BibTeX | (no shortcut) | BibTeX with the attachment blobs (Bdsk-File-N) and BibDesk's bookkeeping fields (Date-Added, Date-Modified, Rating, Read, Local-Url) stripped out — the bibliography, nothing else. |
Whole selection |
Copy As ▸ LaTeX \bibitem |
(no shortcut) | One \bibitem{key} … line per entry, using the formatted citation as its text — for a hand-rolled thebibliography. |
Whole selection |
Note: The first five act on the focused row only, even when several rows are selected. The three Copy As commands act on the whole selection.
Drag a row to insert a \cite{…}#
You can also drag a row from the publications table directly into a TeX editor
(or any text field) and drop it to insert a \cite{…} command for that entry — no
copy/paste round-trip.
Unlike Copy \cite{…}, the drag carries the whole selection when the row
you drag is part of it: the keys are comma-joined into one command, in the order
the rows are shown — \cite{einstein1905,bohr1913}. Drag a row that is not in
the selection and you get just that row.
The cite-command template#
Both the drag-out and Copy \cite{…} use a configurable cite-command
template, set in Preferences → Citations → Cite command (TeX). The default
is \cite{%K}, where %K is replaced by the cite key (or by the
comma-joined keys, when a drag carries several). Change it to suit your document
— for example \citep{%K} for natbib, or \autocite{%K} for biblatex.
(Write %% if you ever need a literal percent sign.)
Tip: Set the template once to match the citation command your LaTeX class
uses, and every drag-out and Copy \cite{…} will produce exactly the right
markup for your paper.
Undo and redo#
Every edit described in this chapter is undoable. Edit → Undo (⌘Z / Ctrl+Z) steps backwards; Edit → Redo (⇧⌘Z / Shift+Ctrl+Z) steps forwards again.
The menu items name the action they will undo — Undo Set Field, Undo Delete Entry, Undo Generate Cite Key, Undo Set Macro — so you can see what ⌘Z is about to do before you press it. When there is nothing to undo the item reads plain Undo and is greyed out.
Some things worth knowing:
- Undo is per library. Each open
.bibhas its own undo history, up to 100 steps deep; the oldest step is discarded beyond that. - A step is a whole state, not one keystroke. That is why a batch operation — deleting twelve selected rows, regenerating a whole selection's cite keys, a Replace All, a script run — comes back in one undo, not twelve.
- Undo works on the in-memory library, exactly like an edit: it marks the document unsaved rather than touching the file. Undoing past your last save and then saving writes the undone state to disk.
Undo preserves entry identity#
An undo restores the library by rebuilding it from a snapshot, and each entry comes back as the same entry — not a look-alike copy. This matters because other parts of the app hold on to entries:
- An editor window you left open for an entry stays attached to it and keeps working. (It used to lose its footing after an undo and report an unknown entry on its next action.)
- Managed attachments still resolve, so an undo cannot orphan a linked PDF.
Two honest caveats. First, the main window reloads its table after an undo, so the row selection is cleared — you will need to re-select. Second, an editor window you have open beside the main window does not repaint itself when you undo there; it keeps showing what it had until the next edit refreshes it. Close and reopen the editor (⌘E) if you need to be sure of what it is showing.
The dirty/save model#
Editing in Bibliofile is explicit-save by default: your changes live in memory until you save them. This section explains exactly what that means and why it was chosen. (An optional autosave can change this — see Optional autosave below.)
In-memory edits#
Every edit you make — a field change, a new cite key, a type switch, a new or
deleted entry, a macro change, an attachment — mutates an in-memory copy of
your library. Your .bib file on disk is not touched. This keeps editing fast
and lets you make a series of changes, review them in the live preview, and
commit them all at once.
The dirty indicator and how to save#
There is no Save button. The document's state is shown by a dot beside the library's name in the window header:
| Header shows | Meaning |
|---|---|
mylibrary.bib |
No unsaved changes; the disk file matches what you see. |
mylibrary.bib • |
You have unsaved changes. (Hover it: "Unsaved changes — press ⌘S to save".) |
mylibrary.bib (saving…) |
A save is in progress. |
To save, press ⌘S (macOS) / Ctrl+S (Windows/Linux), or choose File → Save. The shortcut works from any of the app's windows — including an editor window, which hands the save to its library window.
What a save does, step by step#
When you save, the app:
- Checks the file has not changed underneath you. If the
.bibon disk has been modified since the app last read or wrote it — by macOS BibDesk, a text editor, a Git checkout, a sync client — the save stops and asks first, rather than silently overwriting that work. See Getting Started. - Serializes the entire in-memory library back to BibTeX text in BibDesk's exact on-disk format (see Round-trip fidelity below).
- Backs up the existing file: if a file already exists at the target path,
it is copied to
<your-file>.bib.bakfirst. This.bakalways holds the previous saved version, so a save is recoverable. - Writes atomically: the new text is written to a temporary file in the same directory, then renamed over the target. A rename on the same filesystem is atomic, so your library is never left half-written — even if power is lost or the app crashes mid-save, you end up with either the complete old file or the complete new one, never a corrupt mixture.
- Clears the dirty flag, so the dot disappears.
Tip: Because the backup is overwritten on each save, <file>.bib.bak is a
one-deep safety net (the version immediately before the most recent save), not
a full history. For real version history, keep your library under version
control (e.g. Git) — the plain-text .bib format is well suited to it.
Why explicit save by default?#
Explicit save is the default for good reasons:
- Predictability. You decide exactly when the file changes. A burst of edits (or a deletion you immediately regret) does not silently hit disk.
- Safe interop. If you also open the same library in macOS BibDesk or a text editor, autosave races become possible. Explicit save keeps you in control of when this app writes.
- The backup is meaningful. Because saves are discrete events, the
.bib.baksnapshot corresponds to a deliberate save point rather than an arbitrary autosave instant.
Until you turn autosave on, get into the habit of pressing Cmd+S when you are happy with a batch of changes.
Optional autosave#
If you prefer the app to write changes for you, turn on Preferences → General →
Saving → Autosave. With it enabled, the library is saved automatically about a
second and a half after the document becomes unsaved — the same atomic write with
the same .bib.bak backup as a manual save. It is off by default; the
considerations above (predictability and safe interop with other tools) are why
you opt in deliberately rather than getting it unasked. Undo and redo work
exactly the same either way.
Warning: With autosave off, quitting or closing the document with unsaved changes discards those changes (they were only in memory). Save first if you want to keep them. File → Revert to Saved also discards unsaved changes, reloading the last saved version from disk.
Round-trip fidelity#
A core design goal of Bibliofile is that your .bib file keeps working
flawlessly alongside macOS BibDesk and the wider LaTeX ecosystem. On save, the
app re-emits the library in BibDesk's byte-faithful on-disk format.
What is preserved:
- All entries, their types, cite keys, and fields.
@stringmacros and any@preamble.- The BibDesk group definitions (Static, Smart, URL, Script) stored as
@commentblocks. - The
@bibdesk_infodocument-info block. - Attachment blobs (
Bdsk-File-N) — including any existing macOS file bookmarks, preserved byte-for-byte (see Attachments).
What is normalized (BibDesk's own conventions, applied consistently):
- Field names are lower-cased and fields are written in a canonical sorted
order (with
bdsk-file-N/bdsk-url-Nforced last). - Field values are wrapped in
{…}. - Empty fields are dropped (this is why clearing a field removes it).
- A standard BibDesk header comment is written at the top.
These normalizations are exactly what macOS BibDesk itself does, so a file written here is indistinguishable from one written by BibDesk, and you can move freely between the two. The format has been proven against a golden test corpus including a real BibDesk-authored library.
Quick reference#
Toolbar actions#
| Control | Action |
|---|---|
| + New | Create a new empty entry (of your default type), select it, and open its editor |
| ⧉ Duplicate | Copy the selected entry under a new cite key |
| 🗑 Delete | Delete the focused entry |
| 🌐 Online… | Open the online search to import entries (see Online Search) |
| @string… | Open the @string macro editor |
There is no Save button: save with ⌘S / Ctrl+S (or File → Save). The • beside the library's name in the header means there are unsaved changes.
Opening the editor#
| Action | How |
|---|---|
| Open the editor for an entry | Double-click its row, press Enter with the table focused, click ✎ Edit… in the view pane, or Publication → Edit Publication… (⌘E) |
| Edit another entry at the same time | Just open it too — one editor window per entry, as many as you like |
Editing actions in the editor window#
| Action | How |
|---|---|
| Edit a field | Click the value, type, press Enter (single-line) or click away (textarea); on shared-vocabulary fields (Journal, Publisher, Editor, …) pick from the autocomplete list of existing values |
| Add a field | Click the green + below the fields, fill name + value, press Enter |
| Remove a field | Click the red − on the field's row (required fields can't be removed), or clear its value and commit |
| Override an inherited field | Click the muted (inherited) row and edit it |
| Edit cite key | Click the Cite Key box, type, press Enter |
| Generate cite key | Click Generate, or Publication → Generate Cite Key (Cmd+K) |
| Change type | Choose from the Type dropdown |
| Edit notes | Click Edit in the Annotation section |
| Add/remove attachments | Use the Attachments section (see Attachments) |
Library-wide editing commands (menus)#
| Action | How |
|---|---|
| New / Duplicate / Delete | Publication menu (Cmd+N / Shift+Cmd+D / Delete Publication) |
| Undo / Redo the last edit | Edit → Undo (⌘Z) / Edit → Redo (⇧⌘Z) — the item names the action |
| Find & Replace across fields | Edit → Find & Replace… (⌥⌘F / Alt+Ctrl+F) |
Copy cite key / \cite{…} / citation / RTF / BibTeX |
Edit menu (⌥⌘K / ⌥⌘C / Copy Citation / ⌥⌘R / ⌥⌘B) |
Copy the whole selection as RIS / minimal BibTeX / \bibitem |
Edit → Copy As ▸ |
Drag a \cite{…} into a TeX editor |
Drag a table row out and drop it (carries the whole selection) |
Edit @string macros |
@string… toolbar button or Publication → Macros (@string)… |
Troubleshooting#
"My edit didn't stick." A field value is only saved when you commit it — press Enter in a single-line box, or click away from (blur) a multi-line textarea. If you typed a change and then pressed ⌘S without leaving the field first, the in-progress text was not part of that save. Click into the field, make sure your text is there, press Enter or Tab out, then save again. (Closing the editor window is safe: it commits the field you were typing in first, whether you close it with the Close button, ⌘W, or the window's close control.)
"I lost a field — it vanished when I cleared it."
Clearing a field's value and committing it removes the field (an empty value
is not stored). To blank a field rather than delete it, you generally do not want
to — BibTeX has no concept of an empty field. If you deleted it by mistake,
Edit → Undo (⌘Z) brings it back; otherwise re-add it with the green +
below the fields. If you have already saved, the previous version is in
<file>.bib.bak.
"I can't remove an inherited field / there's no − on it."
Inherited (crossref) fields are not stored on the entry, so there is nothing to
remove there. To stop inheriting a field, either remove it from the parent,
or change/remove the Crossref link on this entry.
"Generate gave me a weird or empty cite key."
With the default format, cite-key generation reads the entry's Author (or
Editor, when there is no author) and its Year. If those are missing or
unusual (no surname, no 4-digit year), the result reflects that. Fill in the
author and year, then click Generate again.
"Enter isn't committing my abstract / long field."
Long fields and the Abstract open as a multi-line textarea, where Enter inserts
a newline. Commit by clicking outside the box (or pressing Tab to move focus
away).
"I typed { and the brace showed up in my title."
You are editing raw BibTeX, so braces are literal. That is correct behavior — use
braces deliberately to protect capitalization, and keep them balanced. See
The raw-value model.
"My changes disappeared after I closed the app." Unless you enabled autosave, unsaved (in-memory) changes are discarded on close. Press Cmd+S / Ctrl+S whenever the • appears beside the library's name in the header. (You can turn on Preferences → General → Saving → Autosave to avoid this.)
"Find & Replace says 'Invalid pattern'." You have ticked Regular expression and the Find text isn't a valid regex. Either fix the pattern, or untick Regular expression to search for the literal text instead.
"Replace All changed fewer/more entries than I expected." Find & Replace is scoped to the currently selected group (the whole library when 📚 Library is selected) and, if the search box has text in it, to the rows currently shown; the Field dropdown limits which field is searched. Run the Find preview first to see exactly which entries and fields will change, and check all three.
"My editor window is showing an old value after an undo." Undo repaints the main window, not the editor windows you have open beside it. The entry itself is fine — close the editor and reopen it (⌘E) to see the undone state. See Undo and redo.